
Installing and debugging a banana vibrating screen involves several critical steps to ensure its proper function and longevity. Banana screens are designed with multiple inclination angles, decreasing from the feed to the discharge end, which helps maintain a relatively constant material bed depth and high travel velocity.
How to install and debug a banana vibrating screen
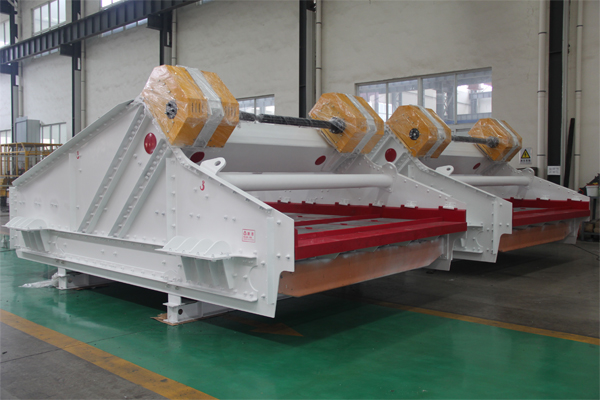
Banana Vibrating Screen Installation
1. Preparation:
Inspect the Equipment: Before installation, thoroughly check the new vibrating screen for any damage during transit, such as rusted bearings, aged seals, or structural deformities. Replace any damaged parts.
Lubrication: If the vibrator was injected with anti-rust oil at the factory, replace it with the appropriate lubricating oil before operation.
Site Preparation: Ensure the foundation (concrete or steel structure) is level and sturdy. If storing outdoors before installation, place the screen stably on sleepers at least 250mm off the ground and cover with a rainproof tarpaulin.
2. Assembling the Screen:
Support/Hanging Device: Install the support or hanging device according to the provided component and installation diagrams. Level the foundation first.
Springs: Carefully select springs based on their marked stiffness values and install them to ensure they are vertical and not twisted. The force of the vibration isolation springs should be uniform. Measure spring compression; the two sets of springs at the feeding end should have the same compression, and similarly for the discharge end. Compression at the feed and discharge ends can differ.
Screen Box Connection: Connect the screen box to the support or hanging device. Adjust the screen box to the specified inclination angle. For hanging screens, adjust both the inclination and the level of the main axis simultaneously, typically correcting the horizontal level first to eliminate deflection.
Motor and Belt Installation: Install the motor, ensuring its foundation is level and its horizontal position is corrected. The center lines of the two belt wheels’ grooves must coincide. Adjust the tension of the triangular belt to be appropriate.
Screen Surface: Install and fix the screen surface according to requirements, ensuring it is evenly tensioned to prevent local vibration.
Connections and Lubrication: Check all connecting parts (screen plate, vibrator, etc.) for secure fastening. Verify lubrication of the transmission part. Ensure motor and control box wiring is correct. Manually turn the transmission part to check for normal operation.
Clearance Check: Confirm that the feed and discharge chutes and the funnel under the screen have no collision points with the screen during operation.
3. Test Run (No Load):
Duration: The initial empty run should be no less than 8 hours.
Observation: During this period, observe:
Smooth and quick startup.
Stable vibration and operation, free from special noise.
Amplitude meets requirements (check with an amplitude plate).
No swaying of the screen box. If swaying occurs, check for excessive spring height difference, uneven wire rope tension, non-horizontal rotation axis, or overly tight triangular belt, and adjust accordingly.
…
For more detailed information about banana screen commissioning and installation, please click here: https://www.hsd-industry.com/news/banana-vibrating-screen-installation-and-debugging/

